Leaderboard
Popular Content
Showing content with the highest reputation on 10/04/2025 in all areas
-
Last week I was on a boat, far from any computer, so that’s why there weren’t any updates. This week I’m back in the office and back to work on the core. The focus has been primarily on optimizations and issue fixes (see dev branch commit log). There were also a couple commits related to PHP 8.4 support. Issue fixes and optimizations will likely continue to get more focus as we get closer to our next main/master version.There are also some Pro module updates in the works as well. Have a great weekend!8 points
-
Image Hotspots Allows a Repeater field to be used to define hotspots on an image. Being able to add multiple fields of any type to the Repeater provides flexibility for the information you can store for a hotspot. Setup 1. Install the module. Two decimal fields will automatically be created on install: hotspot_x and hotspot_y. You can set custom hotspot and highlight colours in the module config if needed. 2. Create a "single" image field (i.e. maximum number of files = 1) that you will use store the image that will have hotspots defined on it. Add this field to a template. 3. Create a Repeater field and add the hotspot_x and hotspot_y fields to the Repeater. Add any other fields you need to store information about the hotspots you will create. Save the Repeater field. 4. In the "Details" tab of the Repeater field, expand the "Image Hotspots" section (this section appears for any Repeater field that has the hotspot_x and hotspot_y fields). For "Image field", select the image field you created in step 2. The "Image height" setting defines the maximum height of the image when displayed in Page Edit. 5. Add the Repeater field to the template you added the image field to in step 2. Usage in Page Edit When an image has been saved to the image field, the Repeater field will display a preview of the image at the top of the field. Click "Add New" to create a new hotspot. The hotspot appears at the top left of the image initially and can be moved by clicking and dragging it to the desired location on the image. The X/Y coordinates of the hotspot will be automatically updated as the hotspot is moved. For precise adjustments you can modify the X/Y coordinates directly and the hotspot position will be updated. To identify which Repeater item corresponds to a given hotspot, click on the hotspot. The corresponding Repeater item header will receive an orange outline. Click the hotspot again to remove the orange outline. To identify which hotspot corresponds to a given Repeater item, expand the Repeater item and focus either the X or Y coordinate fields. The corresponding hotspot will be highlighted in orange. On the frontend It's up to you to display the hotspots on the frontend in any way you need. The values of the hotspot_x and hotspot_y fields are percentages so when given absolution positioning over the image your hotspot markers can preserve their positions as the image scales up or down in a responsive layout. https://github.com/Toutouwai/ImageHotspots https://processwire.com/modules/image-hotspots/3 points
-
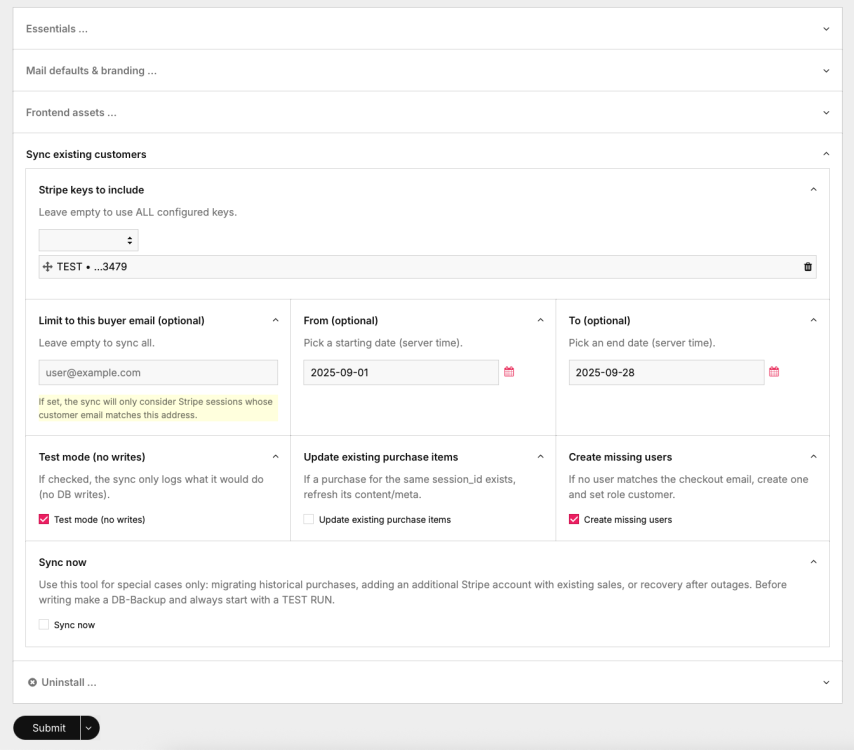
New feature in StripePaymentLinks (v 1.0.7) 🎉 Hi, everyone! We’ve just added a sync helper to the modules config screen that can pull past Stripe Checkout Sessions into ProcessWire. Super handy if you want to… backfill older purchases migrate existing users or just double-check what’s in Stripe vs. what’s in PW How it works: Scans Stripe sessions (with date range + email filter if you like) Matches them to PW users by email Creates missing users (optional) Creates/updates purchase repeater items exactly like live checkouts Has a test-run mode so you can preview before writing You get a nice report right on the config screen (below "Sync now") with totals and per-session actions (SKIP, LINKED, UPDATE, CREATE) plus the line items. Makes it a lot easier to keep things in sync — especially if you had sales before installing the module. Note: since each run fetches sessions and line items directly from Stripe’s API, the total duration depends on network + Stripe’s response times. In our tests with ~120 sessions the sync took about 15 seconds. Grab the latest version and give it a spin. We already tested this version on some live projects and everything works fine, but always backup before you mess with data 😉 Feedback welcome! 🙌 Cheers, Mike2 points
-
Hey folks, fun fact: this module was already featured in this week’s ProcessWire Weekly – even before we managed to post it here in the forum. So, here we are, finally giving it a proper introduction! 😅 TL;DR: This module connects Stripe Payment Links with ProcessWire and provides a simple checkout integration for sites that don’t need a full shop. 🎯 ✅ Drop a Stripe buy button anywhere ✅ Redirect back to PW thank-you or delivery pages ✅ Buyers get accounts, purchases are logged, access is granted ✅ Access mails are sent automatically ✴️ New in v 1.0.7: Sync existing purchases and buyers from Stripe to PW with test/write option ✴️ New in v 1.0.8: Full Stripe subscription support with real-time webhook updates (cancel, pause, resume, renew) and smarter access control logic First things first: What are Stripe Payment Links? Stripe Payment Links are basically hosted checkout pages that you can create directly in the Stripe Dashboard – no coding required. You define a product (or multiple line items) in Stripe. Stripe gives you a unique URL (the “Payment Link”). You can drop this URL behind any button, on any landing page, newsletter, or social media bio. When a customer clicks the link, they’re taken to a secure Stripe Checkout page (PCI compliant, supports all major payment methods, Apple Pay, etc.). After payment, Stripe redirects them back to your success URL. Super simple. But… on its own, Stripe has no idea about your ProcessWire site, your users, or your gated content. That’s where this module jumps in. 🚀 Why another payment module? We at frameless Media often work on small client projects where setting up a full e-commerce shop would be complete overkill. Think: Coaches selling a few courses or workshops Businesses offering a handful of digital products or subscriptions Creators who just need a buy button on a landing page Stripe Payment Links are perfect for this. But: ProcessWire on its own doesn’t handle redirects, user handling, or gated delivery pages. So we built StripePaymentLinks – a lightweight drop-in module to connect Stripe with PW. What it does Handles the redirect back from Stripe Checkout that contains the session id Creates or updates the buyer’s user account Records purchases in a repeater field Manages access to “delivery pages” (only available after purchase) Auto-sends access mails (configurable: never / new users only / always) Provides Bootstrap-based modals for login, password reset, set-password Usage examples Example 1: Sales page + delivery page Sales page has a “Buy now” button (Stripe Payment Link). After checkout, the user is redirected to the delivery page, which is access-protected. → Module logs them in, grants access, and if they’re new: a set-password modal pops up. → An access mail with product links is sent. Example 2: Product without a delivery page Some products don’t need protected pages (e.g. a consulting slot or voucher). → The success redirect goes to a generic thank-you page. → The module shows an access summary block with purchased products and sends the mail. Example 3: Mixed purchase (thank-you + delivery page) A checkout with multiple items: e.g. a “simple product” plus an addon that has its own delivery page. → Thank-you page shows the addon link(s). → The access mail lists all purchased products. Source & License The module is open-source under the MIT License. 👉 GitHub: https://github.com/frameless-at/StripePaymentLinks 👉 ProcessWire modules directory: https://processwire.com/modules/stripe-payment-links/ So yes: if you or your clients just need a few low-barrier buy buttons, not a full-blown webshop, this might be the module you’ve been looking for. If needed we can provide some screenshots and visual examples next week 😉 Happy to hear your thoughts, ideas, and testing feedback! Cheers, Mike1 point
-
Hello @ryan I just updated the UiKit Library to Version 3.24.0. There have been minor changes in the LESS files of UiKit to make use of newer features (for example the @property rule). But that results in an error when trying to compile those files. For example: It seems that the ProcessWire Less module is a bit outdated (or lets say: the wikimedia less parser that is used under the hood). I downloaded the latest wikimedia less parser version and replaced it with the version used in the ProcessWire LESS module which solved some of the errors but not all. For Example the ":is" CSS selector throws an error too (when used inside a LESS file). So I guess just updating the wikimedia less parser does not work 😞1 point
-
Hi, @Jonathan Lahijani! I am pretty sure that your existing setup is superior for the multiproject needs of yours comparing to ddev. You try to standardize while ddev is all for making something custom. I would play with some new php stuff on ddev to keep up with the hype. But would stay with you current setup for the paid work.1 point
-
Outstanding work! I also appreciate the botany refresher, this module is useful and educational.1 point
-
In case you are using this module and want to sync customers/purchases to Mailchimp – we just released an add-on for this module:1 point
-
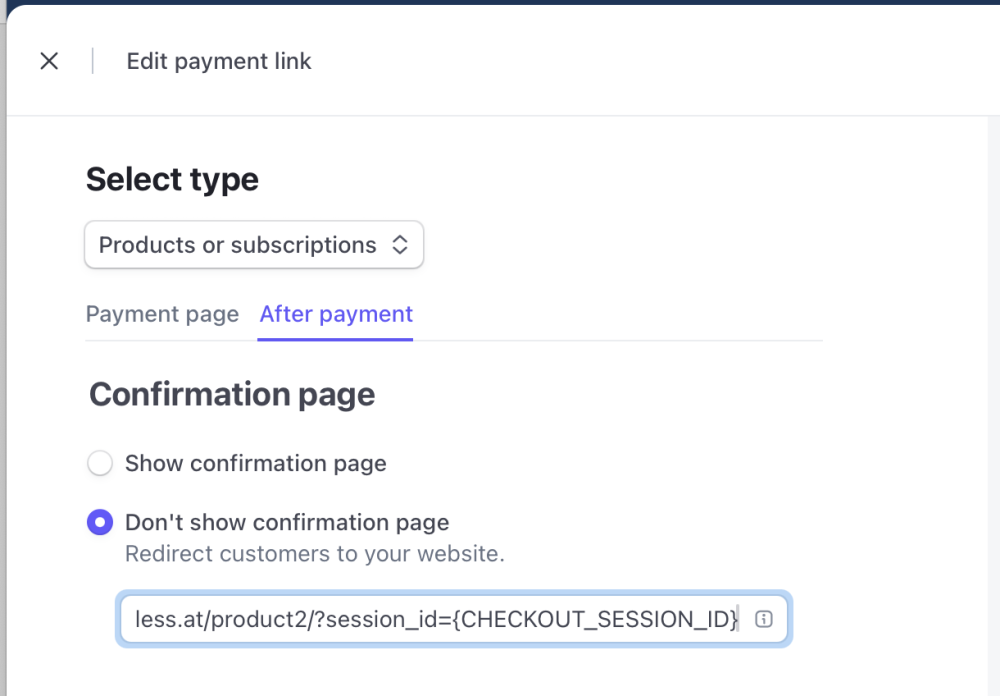
Because this question came up: No, the user does not have to enter any data before checkout. All user data is pulled via Stripes PHP SDK (included with the module). Therefore the only thing needed for the module to work is that the redirect link configured in Stripe contains the session_id param. You configure this directly in the Stripe backend by simply adding ?session_id={CHECKOUT_SESSION_ID} to your desired redirect-URL: Thats all. With this session id the module has access to all data of this specific purchase. Cheers, Mike1 point


