FrontendContact
Simple configurable and expandable contact form for ProcessWire based on the FrontendForms module.
⚠ This module is Beta stage - so be aware of using it on live sites! Only works in combination with the FrontendForms module - so please download this module first.
A configurable module for ProcessWire for outputting one or more contact forms on your site based on the FrontendForms module.
Please note: You have to install the FrontendForms module first, because this module relies on it. So go to https://github.com/juergenweb/FrontendForms first and install the FrontendForms module on your site or install it directly from the ProcessWire modules directory.
Live example
You can see the module in action on this page: https://www.schulfreund.at/kontakt/
Intentions for creating this module
A contact form is something you will need on almost every website. Sometimes you will need more than one (fe if you have a staff member page, and you will offer a contact form for each staff member).
With the FrontendForms module, which is the base for this module, you will be able to create contact forms in an easy way by your own - there is nothing wrong with it, but you have to write (or copy) the code always by your own to each template, whenever you need a form. It is an repetive kind of work, that I want to get rid of and to simplify this process.
My intention to develop such a contact form module was to prevent the manual creation/copy everytime you need and contact form, to save a lot of time and to keep the template clean from a lot of code. But one goal was to keep the module very flexible, so that the form could be adapted, customized and enhanced to my needs. The main goal was to add a complete working contactform with only one short line of code and this is possible with this module.
Requirements
- ProcessWire 3.0.195 or newer
- PHP 8.0 or newer
- FrontendForms 2.2.19 or newer: Please download and install it from https://github.com/juergenweb/FrontendForms first.
Highlights
- Fast and easy integration of a contact form inside a template by using only one line of code
- Show/hide certain fields of the form depending on your preferences and needs
- Beside the default fields you will be able to extend the form with additional fields if needed
- Highly customizable (change order of fields, add custom CSS classes,...)
- Run as many forms on one page as you want
- Possibility to offer file upload to upload multiple files, which can be sent as attachments
- Usage of all the benefits of FrontendForms (fe. CAPTCHA, various security settings,...)
- Multi-language
- IP of the sender will be send with the email too, so you can use it for IP-blocking if you will get a lot of spam from a certain IP
- Supports Ajax form submission (as introduced in FrontendForms 2.1.47)
- Support for sending mails with the following 3rd party PW-modules: WireMailPostmark, WireMailPostmarkApp, WireMailSmtp, WireMailPHPMailer
- Logging of successful form submissions can be enabled
- Supports saving of mails as pages too (you can decide if you want to send email only, to save email as a page or do both)
- Extra module FrontendContact Manager included which creates a new admin page under "Setup" to list and search all messages
Table of contents
- Configuration
- Integrations of forms on the frontend
- Special contact form methods
- Extending the form with additional inputfields
- Run multiple forms on one page
- Save messages as pages
- Multilanguage
Configurations
After you have installed the module, you have to set a default email address where the mails should be sent to. This email address can be entered manually or you can choose a ProcessWire field, which contains the email address. All other configuration options are optional.
Show or hide the following fieldsgender, name, surname, subject, file upload, privacy and send copy (email and message field are mandatory and therefore permanent and not selectable whether to be shown or not)Map the following fields to fields inside the user templateemail, gender, name, surname. If you have fields inside your user template which corresponds to fields inside the contact form, you can link them. This could be fe name, surname or email field. If a user is logged in, than the value of the appropriate mapped field of the user template will be set as value for that input field on the frontendSet the following fields to required or notgender, name, surname, subject (send copy field is always optional and privacy field is always required, if privacy checkbox has been selected. Therefore, for both fields the status cannot be changed)Set a global receiver email addressYou can enter an email by text, or you can choose a PW field, which contains the valueSet a global minimum form submission timeSet a global minimum time before a form is allowed to be submitted (spam protection)Select email templateChoose a HTML mail template for your email or send it as plain textSelect using an external mail service for sending mailsIf you have installed 3rd party modules for sending mails and these modules are compatible with this module, you can select if you want to use one of these modules for sending the mails of this module or not.Select a max filesize for uploded files templateYou can limit the filesize of uploaded files by setting a global limit.Select what should be done after successfull form submissionYou can select if you want to send an mail only, save the message as a page only or a combination of both.
Each global configuration setting can be overwritten on per form base.
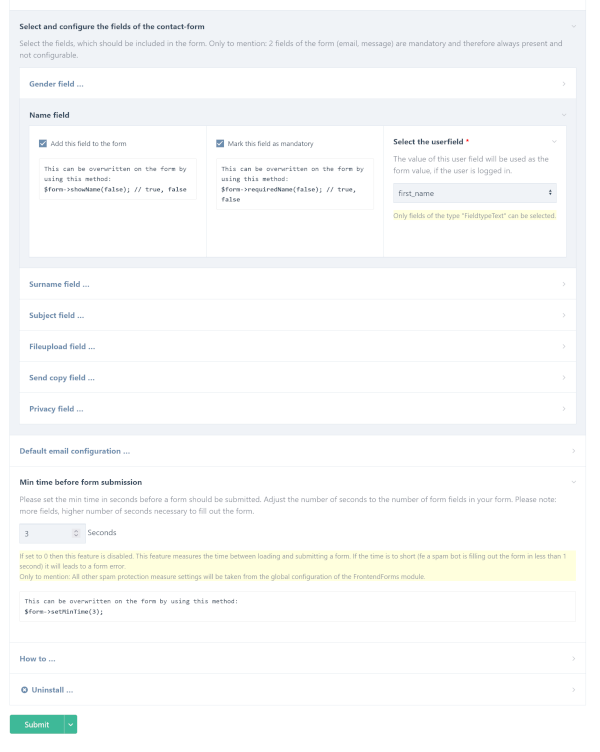
The image shows the configuration screen with the tab of the name field open. As you can see, you can add or remove a field from the form by checking the box. The same procedure can be done for the required status and if an appropriate field exists inside the user template you can map this field to the form field, so that the value will be used if a user is logged in.
Integrations of forms on the frontend
If you want to use the global settings of the module configuration, enter the following code inside a template, where you want to include your contact form.
// render the form
echo $modules->get('FrontendContact')->render();
This will output the complete contact form using the settings of the module configuration - a simple one-liner!
If you want to change some parameters of the global settings (fe changing of the receiver address, hide a certain field,...), you have to grab the form object first, manipulate all the parameters or elements and render it at the end. Just take a look of the following example to change the receiver address. You will find much more examples on how to customize the form inside the customize.php inside the examples folder or inside the module configuration page of this module.
// render the form
$form = $modules->get('FrontendContact')->getForm(); // this loads the form object for further manipulation
$form->to('office@myemail.com'); // set or overwrite the recipient email address
echo $form->render();
Special contact form methods
Beside the methods of the FrontendForms module, I have added some extra methods for this module to make it much more confortable to manipulate the form.
getForm() method
This method returns the form object and this method is needed to manipulate values of the form.
to() method
This method is the same method as the WireMail to() method. You can enter a recipient for your contact form. If you have entered a default recipient inside the configuration, this method will overwrite this recipient.
$form->to('office@myemail.com'); // set or overwrite the recipient email addressIf you enter multiple recipients, the mail will be send to each of them.
$form->to('recipient1@myemail.com');
$form->to('recipient2@myemail.com');
$form->to('recipient3@myemail.com');
subject() method
This method is the same method as the WireMail subject() method. You can enter a fixed subject for your contact form. This can be useful, if you disable the subject field on the form and you will display a custom subject message instead.
$form->subject('New custom subject for my contact form');Show or hide fields methods
With these methods you can overwrite the global settings to show or hide a form field on the form. As the parameter you have to set true or false.
TRUE: The form field will be displayed on the form
FALSE: The form field will not be included in the form
BTW: You do not have to enter the value false inside the parenthesis - you can leave them empty ;-)
$form->showGender(true); // gender field will be included
$form->showName(true); // name field will be included
$form->showSurname(true); // surname field will be included
$form->showSubject(false); // subject field will not be included
$form->showCallback(true); // Request a callback checkbox field will be included
$form->showPhone(true); // phone field will be included
$form->showPrivacy(0); // privacy field will not be included, 1: checkbox will be displayed, 2: privacy text will be displayed
$form->showSendCopy(false); // send copy field will not be included
$form->showFileUploadMultiple(false); // file upload field will not be included
Set fields to required or not
You can change the required status of each of the following fields on per form base.
$form->requiredGender(true); // gender field will be required
$form->requiredName(false); // name field will not be required
$form->requiredSurname(); // surname field will not be required
$form->requiredSubject(true); // subject field will be required
All other fields (message, email, data privacy, file upload and send copy) have a fixed status and cannot be changed to required or not.
Change the position of a specific field inside the form
I have set the order of the default fields inside the form according to my preferences. Maybe you disagree with me and you want to change the position of a field to be on another place.
For this reason you can use the addBefore() and addAfter() method. This means that you can position a specific field before or after another field (reference field).
Example: You want to position the name field after the surname field.
Default order:
- name field
- surname field
Preferred order:
- surname field
- name field
//In this case you have to grab the name field object and the surname field object
// to get the name attribute of a field, please take a look inside the sourcecode, copy the name attribute of the field and add it inside the parenthesis of the getFormElementByName() method
$name_field = $form->getFormElementByName('contact-form-name'); // the name field object
$surname_field = $form->getFormElementByName('contact-form-surname'); // the surname field object

// now lets add the name field after the surname field
$form->addAfter($name_field, $surname_field);
Thats all! The name field has changed its position and will be after the the surname field. You can do this with other fields too if needed.
Restriction: The privacy field position is always before the submit button and cannot be changed, because this is the place where it should be.
Get fields for further customization methods
Each field can be customized further individually. You have to use the methods from the FrontendForms module. You will find more information inside the readme file of the FrontendForms module - so take a look there. To grab each form field object you have to use the FrontendForms method getElementByName(). Take a look at the source code to get the name of the field you want to change.
So please do not wonder, if your manual changing of the required status has no effect in this case. Please note: This will only happen if a user is logged in.
$genderfield = $form->getFormElementByName('contact-form-gender'); // returns the gender field object, please take a look inside the source code to get the correct name attribute of the fieldNow you can add fe some custom classes for styling purposes:
$genderfield->setAttribute('class', 'mynewclass');The manipulation of form fields can be done with methods from the FrontendForms module, so I do not want to get to much into detail - please study the docs of the FrontendForms module.
Extending the form with additional input fields or other elements
The default form contains pre-defined input fields, which should be enough in most cases. But sometimes you will need to add an additional input field or you want to add a fieldset, a text or whatever to the form.
For this scenario, you will be able to extend the form with new elements and you can set the position of these elements inside the form via 2 methods: addBefore() and addAfter().
Both methods are from the FrontendForms module and will be used to add a new element at a new position inside the form or to move an existing form element to a new position. You will find a detailed information about these 2 methods in the docs of the FrontendForms module.
To demonstrate how it works, I have included an example on how to add a new input field inside the examples folder: So please take a look at the addingnewfield.php and study the example on how to extend the form with new elements.
In this case a new phone number field was added after the email field.

The next example is about how to add additional elements to form. In this case 2 fieldsets and 1 additional text above the name field. You will find this examples inside the addingfieldsetandtext.php inside the examples folder.

Run multiple forms on one page
You can run as many forms on one page as you need. The only thing you have to take care of is that you have to add an unique ID to each form. This is necessary for the form validation because it needs to determine which form has been submitted and should be validated. BTW it would also not be valid HTML to use the same id for 2 elements ;-).
$form1 = $modules->get('FrontendContact')->getForm('form1'); // add id inside the getForm() method
$form1->to('email1@example.com'); // add a receiver email address for form 1
//$form1->subject('Message via form 1'); // optional if you want to set a fixed subject
echo $form1->render();

$form2 = $modules->get('FrontendContact')->getForm('form2'); // add id inside the getForm() method
$form2->to('email2@example.com'); // add a receiver email address for form 2
//$form2->subject('Message via form 2'); // optional if you want to set a fixed subject
echo $form2->render();
As you can see, you have to enter the id as parameter of the getForm() method of each form. If you do not enter the id, each form will have the default id "contact-form" which will be added by default if no id was set. This should not be the case, because the validation would not work properly.
Save messages as pages
The standard task of a contact form is to send the form data as an e-mail. However, this module also offers you the option of saving the content of the form as a page.
The place to save all pages is in the admin tree under the parent Frontend Contact page, which is created automatically.

In addition, all fields for saving the data are also created automatically. You don't have to worry about it. Each child page represents a message sent through the form.
There is a configuration field in the backend where you can choose whether to save messages as pages.

Save custom fields in database too
As you know, you can extend the contact form with custom fields. If you want to store the values of these fields inside the database too, you can do this by using the saveField() method.
This method maps a custom field to a corresponding PW field within the frontend-contact-message template.
Example: You want to add a custom field of the type InputText - a default text input field - to the form.
$form = $modules->get('FrontendContact')->getForm();

// create and add a new custom text field to the contact form
$text = new \FrontendForms\InputText('extratext');
$text->setLabel('Extra text');
$form->addAfter($text, $form->getFormElementByName('subject')); // this custom field will be displayed after the subject

echo $form->render();
Now you've added a new text input to the form, but the value of that field isn't currently stored in the database. To do this, you need to create a PW field for the specified custom field in the frontend and add that PW field to the frontend-contact-message backend template. You just need to make sure that the PW field is suitable for storing the value of the custom frontend field. It won't work if you want to store the value of a Select multiple inside a text field, for example.
Take a look at the table below to see which PW field type is suitable for your custom field:
| FrontendForms Custom field class | PW field type |
|---|---|
| InputWeek | FieldtypeText |
| InputTel | FieldtypeText |
| InputRange | FieldtypeText |
| InputUrl | 'FieldtypeURL, FieldtypeText |
| InputColor | FieldtypeText |
| InputNumber | FieldtypeInteger |
| InputTime | FieldtypeDatetime, FieldtypeText |
| InputText | FieldtypeText |
| Username | FieldtypeText |
| Phone | FieldtypeText |
| InputEmail | FieldtypeText, FieldtypeEmail |
| Textarea | FieldtypeTextarea |
| InputDate | FieldtypeText, FieldtypeDatetime |
| InputDateTime | FieldtypeText, FieldtypeDatetime |
| SelectMultiple | FieldtypeOptions |
| Select | FieldtypeOptions |
| InputCheckbox | FieldtypeCheckbox |
| InputCheckboxMultiple | FieldtypeOptions |
| InputRadio | FieldtypeOptions |
| InputRadioMultiple | FieldtypeOptions |
| InputPassword | FieldtypeText |
| Password | FieldtypeText |
| PasswordConfirmation | FieldtypeText, FieldtypePassword |
| InputMonth | FieldtypeText |
As you can see, a custom field can sometimes be mapped to more than one type of PW field. It's up to you which one you want to prefer. Some input fields can only be mapped to one type of PW field.
Taking a look in the table, you can see that the appropriate PW field for the given custom field of the class InputText has to be mapped to a PW field of the type FieldtypeText.
The next step is to create this PW field and add it to the template frontend-contact-message.
After you've done that, the final step is to map the custom field to the PW field that will be appended to the form object using the saveField() method.
$form = $modules->get('FrontendContact')->getForm();

$text = new \FrontendForms\InputText('extratext');
$text->setLabel('Extra text');
$form->addAfter($text, $form->getFormElementByName('subject'));

// this is the new mapping method, which is needed to save the value of the custom field to the appropriate PW field
$form->saveField('extratext', 'pw_extratext');

echo $form->render();
The 2 parameters you have to add inside the parenthesis of the saveField() method are:
- first parameter: the name attribute of the frontend custom field (in this case extratext)
- second parameter: the name attribute of the PW field to save the data to the database (in this case pw_extratext)
Now, the value of the custom field will be stored in the database too.
Limitations: Only the field types mentioned in the table can be stored inside the database.
Extra module FrontendContact Manager
This module includes an extra module called FrontendContact Manager which is optional and has to be installed manually. This module adds a new page under the setup navigation menu item and this page contains all messages inside a paginated table.
You can search this table for a specific message by using certain filter criteria, so it should be a helper module for administrators. This module works only if you have selected to save messages as pages too.

Multi-language
This module is ready for usage in multi-language site. The module will be shipped with the German translation file (default is English). If you want to provide a language file for another language, please send it to me over GitHub and I will include it in the module for other users.
To-Do
- More testing
More modules by juergen
FrontendLoginRegister
User login/registration component for ProcessWire using the FrontendForms module.9FrontendContact
Simple configurable and expandable contact form for ProcessWire based on the FrontendForms module.5Openinghours
Fieldtype that stores opening hours for each day of the week (including additional input field for holidays)5Image Placeholder
A configurable module for creating placeholder images by using TrueTypeFonts for the placeholder text3Publish/Unpublish pages
Publish/unpublish, delete or move pages depending on dates and times using LazyCron.3Fieldtype Object Dimensions
Fieldtype to store length, width, height and to calculate and store the volume and area of an object.2SnowFallAnimation
Module for creating and animating snowflakes on a web page using HTML5 canvas and JavaScript classes.2