16 August 2019 by Ryan Cramer
ProcessWire added WebP image support this year and many have been adopting it enthusiastically in existing projects. In this post we’ll look at a process used for migrating an existing website to use WebP images. We’ll cover everything from preliminary considerations to implementation and testing, with lots of tips and tricks along the way.
This week I had such an opportunity to convert a rather large existing ProcessWire site to use WebP images. This site uses a lot of photos (more than 20k of them) and there was major potential for bandwidth savings by using WebP. This week that update was launched and we reduced the bandwidth needs for the site’s images by 56%, just by switching to WebP images (for clients that support it). That’s a rather amazing improvement for site speed and user experience.
Here we'll take a closer look at the process of converting an existing website to use ProcessWire’s new WebP implementation, just in case it's helpful to anyone else doing the same. (I also wanted something to refer back to for the next site I do this on). A big thanks to Horst for making WebP possible in ProcessWire. There's also a new version of the ProcessWire core on the dev branch (3.0.138) which contains various minor updates, and if you are following along with the examples in this post, note that some of them require this version (3.0.138).
WebP image considerations
Does conversion to WebP images make sense for your website?
For an existing site, the first thing to consider is whether making updates to add WebP images as an option is worthwhile. For sites that depend heavily on images (like those in ProcessWire image fields), it can make a lot of sense given the potential bandwidth savings.
Smaller images means faster load time with your pages, and thus better user experience, and better performance with search engines. Since WebP is an image format from Google, I gather they like to see it on the sites they crawl. Whether that’s because they are looking for it specifically or just noticing the reduced bandwidth (and thus increased performance) on user experience, who knows; but I think it’s a safe bet that using WebP may be helpful on the SEO side.
Also consider the increased disk space requirements for WebP images, which is one potential drawback. While WebP images may reduce bandwidth needs (for browsers that support it) they will also increase the disk space needs on the server side. That's because WebP images won't be replacing your JPG/PNG images; instead they will be added on as additional images. So if you've got 1 gigabyte of images on your site, plan on at least another 500-700 megabytes of space to store the WebP versions of them. Disk space is usually much cheaper than bandwidth, so for most the benefits of reduced bandwidth likely far outweigh the drawbacks of increased disk space usage, but it's still something to consider.
Will your traffic benefit from WebP images?
There’s also the question of how much of your audience will benefit from WebP images. As I understand it, rough 70% of web traffic can benefit from WebP, but whether that corresponds to your web traffic or not depends. Current versions of Chrome, Firefox and Opera all support WebP, as do several other browsers, but there are two major browsers that don’t: Internet Explorer and Safari. (See WebP browser support). Why they are dragging their feet on supporting WebP isn’t clear, but if your traffic consists primarily of IE and Safari users then consider that they won’t benefit from WebP at present.
From what I understand, Safari is experimenting with WebP, so I would bet we’ll see support soon. And when that happens, IE won’t have much choice but to support it in order for the browser to remain viable. Given all this, in my opinion, WebP is a good investment to make right now, especially if at least 50% of your traffic can support it.
Does your web server support generation of WebP images?
A lot of web servers may not yet be WebP capable. Though hopefully most commercial hosting providers are by now. In ProcessWire, you can use WebP so long as the server supports it either in PHP GD or in ImageMagick via PHP’s IMagick library. But it may not be clear how to easily tell whether your server has support or not. So here's a good place to start:
To determine whether your server supports WebP, ProcessWire 3.0.138 comes with a new helper function that you might find useful (ImageSizer::getEngineInfo). Try adding the following to your /site/templates/admin.php file (temporarily). If trying on a production server, you may want to wrap this with an if($user->name == 'your-name') …
$s = new ImageSizer();
$s->message($s->getEngineInfo());
Then view any page in your admin, and you'll have a notification at the top that looks something like the following:
[GD] => Array(
  [name] => GD
  [title] => GD Image Sizer
  [class] => ImageSizerEngineGD
  [summary] => Uses PHP’s GD library to resize images.
  [author] => Horst Nogajski
  [moduleVersion] => 1
  [libraryVersion] => bundled (2.1.0 compatible)
  [priority] => 1
  [sources] => Array(
    [0] => JPG
    [1] => JPEG
    [2] => PNG
    [3] => GIF
   )
  [targets] => Array(
    [0] => JPG
    [1] => JPEG
    [2] => PNG
    [3] => GIF
   )
  [quality] => 90
  [sharpening] => soft
  [runOrder] => 91
)
We are interested in the "targets" property above. As you can see, WEBP is not in the list of supported target formats here, which means my localhost server doesn't support WebP with PHP’s GD image library (though luckily my production web server does).
Next I installed the core ImageMagick module (Modules > Install > ImageSizerEngineIMagick) and re-ran the test above. It then showed me an additional array of information for IMagick and luckily WebP was in the list of target formats.
So long as you've got WebP in the list of available target formats for either GD or IMagick, then you are ready to start using WebP.
Implementing WebP images
Selecting a WebP output strategy
Because WebP isn't supported by all browsers, you need to have an output strategy that will deliver the JPG/PNG images when the client doesn't accept WebP images (which will likely be at least 30% of your traffic). We've looked at some of these strategies before in this earlier post.
For a website that you've not developed yet, it might make sense to consider using ProcessWire's API to output both WebP and the original image format side by side in an HTML5 <picture> tag. In this way, you let the browser decide what it wants to use…
<picture>
  <source srcset="<?=$image->webp()->url?>" type="image/webp">
  <img src="<?=$image->url?>" alt="<?=$image->description?>">
</picture>
…But for an existing website, it might not be practical to go in and wrap all existing <img> tags with <picture> tags. Even for new websites, it's a lot of extra markup. You might not even be using <img> tags for your images, and instead bundling them into data attributes for a lightbox, gallery, slider or similar.
In my case, I was updating a rather large existing website, and images were being output in a lot of places, in different data attributes, dynamically generated JS and more ... using <picture> tags wasn't going to work.
Because we determined that at least 50% of the site's traffic could accept WebP, we opted to refer to WebP images directly in our markup and have Apache redirect to the equivalent JPG/PNG image when the client browser didn't support WebP. This is Horst WebP strategy #2.
Implementing the WebP strategy
As mentioned in the previous section, we decided that we would have the website output WebP image links and let Apache redirect to the equivalent JPG/PNG images when the client didn't support WebP.
To avoid introducing any new issues in the existing website, I wanted to have it automatically deliver WebP images everywhere that it was currently delivering JPG/PNG images, without updating any existing site markup. I did this by adding the following to my /site/ready.php file:
$wire->addHookAfter('Pageimage::url', function(HookEvent $event) {
  static $n = 0;
  $image = $event->object;
  if(++$n === 1 && in_array($image->ext, [ 'jpeg', 'jpg', 'png' ])) {
    $event->return = $image->webp()->url();
  }
  $n--;
});
The above hook ensures that any requests for an image URL output the WebP version rather than the JPG/PNG version. And if the WebP file doesn't yet exist, then it gets created as part of this call as well. This works great, except that:
- It also makes images in the admin output in WebP format (which I didn't want, and it might not be fully compatible).
- Any pages with lots of WebP images to generate might take a long time to render the first time they are viewed.
In our case, some of the pages had a lot of images and could take up to a minute or more to create all the WebP versions — it was not an option to let this happen with live traffic. So we instead used the following in our /site/ready.php file, which solves both issues mentioned above (rather than the earlier example):
// use WebP when query string "webp=1" is present
if($input->get('webp')) $config->set('useWebP', true);

if($config->useWebP && $page->template != 'admin') {
  $wire->addHookAfter('Pageimage::url', function(HookEvent $event) {
    static $n = 0;
    $image = $event->object;
    if(++$n === 1 && in_array($image->ext, [ 'jpeg', 'jpg', 'png' ])) {
      $event->return = $image->webp()->url();
    }
    $n--;
  });
}
With the above code, WebP images are never output in the ProcessWire admin (where we don't want them). In addition, WebP images aren't output unless either we add a $config->useWebP = true; to our /site/config.php file, or the URL has a webp=1 in the query string.
Our WebP launch strategy was to crawl all of the pages with the webp=1 in the query string to generate all of the WebP images. This ensures that the time required to do this would never be imposed on the site's live traffic. Once the site was fully crawled and all WebP images generated, we could add $config->useWebP = true; to our /site/config.php file, and then it would deliver WebP images all of the time.
The WebP image generating crawler
In our case we had a few thousand URLs, and more than 20k images to generate WebP files for. I built a crawler to do this for us, and let it run for about 12 hours to generate more than 26,000 WebP images. The crawler is a unix shell script that is run from the command line:
#!/usr/bin/php
<?php namespace ProcessWire;

if($argc < 2) die("Usage: $argv[0] template_name\n");
$template = $argv[1];

include('/home/user/public_html/index.php');

$http = new WireHttp();
$items = $pages->findMany("include=hidden, sort=name, template=$template");

foreach($items as $item) {
  $url = $item->httpUrl() . '?webp=1';
  echo "Fetching $url ...";
  set_time_limit(600); // allow up to 10 mins per URL
  $timer = Debug::timer(); // time how long it takes
  $result = $http->get($url);
  $code = $http->getHttpCode(true);
  $elapsed = Debug::timer($timer);
  echo "$code ({$elapsed}s)\n";
}
I named my script webp_crawler and once doing a chmod +x webp_crawler and then running it via ./webp_crawler basic-page (replacing "basic-page" with the name of the template used by pages you want to crawl) it went to work for the whole day. It generated all of the WebP images for the website, without interfering with the site's regular traffic.
While this is a command line script, you could just as easily create such a crawler in a template file for a page on your ProcessWire-powered website. While that would work just fine, the benefit of the command line script is that it's not being delivered by Apache, all output happens in real time (making it easier to monitor), and there's no web server running the crawler to timeout. That becomes a factor because something like this might run for hours on end, which your web server may, or may not, be willing to do if the crawler is itself running on Apache.
Implementing the WebP fallback strategy
Because not all browsers support WebP, an important part of the WebP implementation is making sure that those browsers will get the usual JPG/PNG images. We used the .htaccess rules from Horst's strategy 2, which looks like this below (before we modified it):
RewriteCond %{HTTP_ACCEPT} !image/webp [OR]
RewriteCond %{REQUEST_FILENAME} !-f
RewriteCond %{DOCUMENT_ROOT}/$1$2$3/$4.jpg -f
RewriteRule ^(.*?)(site/assets/files/)([0-9]+)/(.*)\.webp(.*)$ /$1$2$3/$4.jpg [R=307,L]

RewriteCond %{HTTP_ACCEPT} !image/webp [OR]
RewriteCond %{REQUEST_FILENAME} !-f
RewriteCond %{DOCUMENT_ROOT}/$1$2$3/$4.png -f
RewriteRule ^(.*?)(site/assets/files/)([0-9]+)/(.*)\.webp(.*)$ /$1$2$3/$4.png [R=307,L]
In our case we had to use something similar but a little different. First off, our JPG images come with both JPG and JPEG extensions, so we had to add a new section for the JPEG extensions. In addition, the images are all hosted on an AWS Cloudfront CDN via ProCache, so we wanted the fallback images to still deliver from the CDN. (I substituted our actual CDN url with cdn.com below).
RewriteCond %{HTTP_ACCEPT} !image/webp [OR]
RewriteCond %{REQUEST_FILENAME} !-f
RewriteCond %{DOCUMENT_ROOT}/$1$2$3/$4.jpg -f
RewriteRule ^(.*?)(assets/files/)([0-9]+)/(.*)\.webp$ https://cdn.com/assets/files/$3/$4.jpg [R=307,L]

RewriteCond %{HTTP_ACCEPT} !image/webp [OR]
RewriteCond %{REQUEST_FILENAME} !-f
RewriteCond %{DOCUMENT_ROOT}/$1$2$3/$4.jpeg -f
RewriteRule ^(.*?)(assets/files/)([0-9]+)/(.*)\.webp$ https://cdn.com/assets/files/$3/$4.jpeg [R=307,L]

RewriteCond %{HTTP_ACCEPT} !image/webp [OR]
RewriteCond %{REQUEST_FILENAME} !-f
RewriteCond %{DOCUMENT_ROOT}/$1$2$3/$4.png -f
RewriteRule ^(.*?)(assets/files/)([0-9]+)/(.*)\.webp$ https://cdn.com/assets/files/$3/$4.png [R=307,L]
I added these rules after section 2 (Access Restrictions) in the .htaccess file, though they should work anywhere after the RewriteEngine On line. With the above rules in place, clients that don't support WebP images (like IE and Safari) automatically get 307 redirected to the equivalent JPG/JPEG/PNG version of the image, rather than attempting to load the WebP version.
In addition to the above .htaccess additions, we are also managing cache control headers for various file types on the site, so we added one for WebP images. The following was added with our other cache control headers, which are above all of ProcessWire's .htaccess rules:
AddType image/webp .webp
<IfModule mod_expires.c>
  ExpiresByType image/webp "access plus 1 year"
  # ...along with ExpiresByType rules for other file types
<IfModule>
CDN considerations for WebP images
We are using AWS Cloudfront and found at first that WebP images were not working through the CDN — they were just redirecting back to the non-WebP images on the web server. We found that we needed to add a behavior in the CDN settings (in AWS) to whitelist the HTTP "Accept" header. This allows the CDN to see this header. This is necessary because it is the means by which browsers communicate to the server what formats they accept, also known as content negotiation.
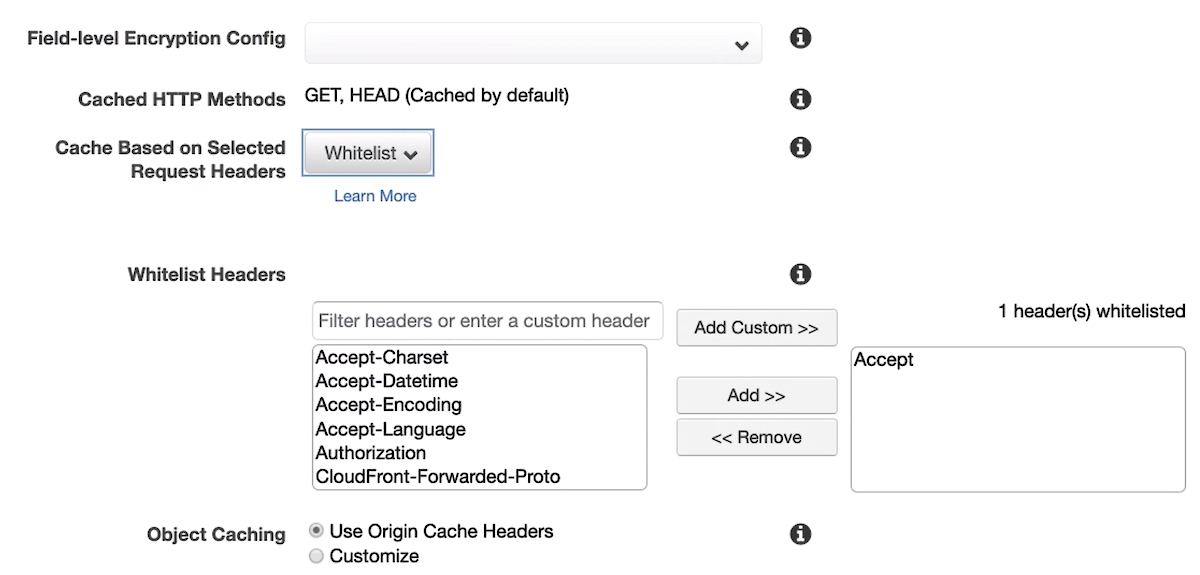
If image/webp is not part of the Accept HTTP header, then the server doesn't know the client accepts WebP. By whitelisting this Accept header, the CDN was again able to work properly with WebP images just like it does with existing JPG/PNG images. Here's an article that was helpful in tracking this down: WebP, content negotiation and CloudFront.
Please also make sure that your Apache rewrite rules (in this section before this) refer to your CDN URL in the RewriteRule lines.
Handling WebP images in rich text fields
One case that our WebP generating hook can't accommodate is for images that appear in rich text fields like CKEditor. Those image references are stored statically in HTML, in the database. So there's no url() method to hook into and modify them on the fly. This was the job for a custom Textformatter module. I built such a module to handle this case, called TextformatterWebpImages located in the modules directory and on GitHub. To use it, all you need to do is install the module and then:
- Locate any of your CKEditor fields where you want to apply it and edit them (i.e. Setup > Fields > Body).
- Select “Convert JPG/PNG images to WebP” as one of the "Textformatters" in the field settings (Details tab).
Once installed, it will generate WebP images automatically for any image files linked in the content (the first time the page is viewed). If there are a lot of them, it could be time consuming, so you may want to crawl these URLs like with the others, so that the WebP-images are ready-to-go for live traffic. In our case, we primarily had these embedded images on pages using our blog-post template, so we crawled them with: ./webp_crawler blog-post
Note that because this part is powered by a module, it will be enabled with WebP images as soon as you add it as a Textformatter on your rich text/CKEditor fields. As a result, if you want to do thorough testing with WebP first, you may want to enable this part after going live with the rest of your WebP images.
Completing and testing WebP image output
Testing WebP image support on the website
Once we'd taken care of everything mentioned above, it was time to start using the website with WebP images. Because we wanted to test it out among ourselves first, we set it up to use the WebP images only for superusers. To do this, I modified the top of the /site/ready.php file to enable WebP if the webp=1 query string was present in the URL (as before), OR if a superuser was logged in:
// use WebP when querystring "webp=1" is present OR superuser logged in
if($input->get('webp') || $user->isSuperuser()) $config->set('useWebP', true);
From there I could browse the website in Chrome (or Firefox) to make sure all the WebP images were coming through as expected and looked good, etc. Then I logged in with Safari (which does not support WebP) to confirm that the fallback to regular JPG/PNG was working as expected. Whether testing WebP or the fallback images, the browser’s developer tools "Network" tab is helpful in observing what images get loaded on any given page. For a WebP-supporting browser, you should see just the WebP images in the Network tab. For a non-WebP browser, you should see the WebP image requests receive HTTP 307 responses, and the browser loading the equivalent JPG/PNG image instead.
If using ProCache with CDN, you may want to first test with CDN disabled for logged-in users, making sure everything is working server-side. Then re-enable the CDN and test again, making sure the WebP images successfully deliver in Chrome/Firefox and fallback in Safari/IE, just like they do with the CDN disabled.
Going live with WebP images
Once you've tested everything while logged in, and it's all working well, it's time to go live with WebP. If you've used the strategies above, then the only thing necessary is to add this to your /site/config.php file:
$config->useWebP = true;
Note that the above is a custom config setting we added ourselves for this purpose (it is not part of ProcessWire).
After enabling WebP for this client's website, it was a noticeable improvement in page performance and it made me really curious about the technical details. I came up with a hook to add a new $page->webpInfo(); method that returns a string or array of details about the WebP images on the page, and how much space they saved relative to their JPG/PNG equivalents. This method is added to the /site/ready.php file:
/**
 * Adds a webpInfo() method to Page objects
 *
 * Usage:
 *   $s = $page->webpInfo(); // get info string
 *   $a = $page->webpInfo(true); // get info array
 *
 * Requires ProcessWire 3.0.138
 *
 */
$wire->addHook('Page::webpInfo', function(HookEvent $event) {

  $page = $event->object;
  $files = $event->wire('files');
  $getArray = $event->arguments(0) === true;
  $fileTotal = 0;
  $webpTotal = 0;
  $qty = 0;

  if($page->hasFilesPath()) {

    $imageFiles = $files->find($page->filesPath(), [
      'extensions' => [ 'jpeg', 'jpg', 'png' ],
      'recursive' => 0
    ]);

    foreach($imageFiles as $file) {

      $info = pathinfo($file);
      $webp = "$info[dirname]/$info[filename].webp";

      if(!file_exists($webp)) {
        // if file.webp does not exist, try file with extension plus .webp
        $webp = "$info[dirname]/$info[basename].webp"; // i.e. file.jpg.webp
        if(!file_exists($webp)) continue; // no webp file available
      }

      // webp file is available
      $qty++;
      $webpTotal += filesize($webp);
      $fileTotal += filesize($file);
    }
  }

  $pct = $fileTotal ? round((($fileTotal-$webpTotal)/$fileTotal)*100) : 0;

  $a = [
    'qty' => $qty,
    'qtyStr' => sprintf(_n('%d file', '%d files', $qty), $qty),
    'pct' => $pct,
    'fileSize' => $fileTotal,
    'fileStr' => wireBytesStr($fileTotal, true),
    'webpSize' => $webpTotal,
    'webpStr' => wireBytesStr($webpTotal, true),
    'saveSize' => $fileTotal - $webpTotal,
    'saveStr' => wireBytesStr($fileTotal - $webpTotal),
  ];

  $a['str'] =
    "$a[fileStr] → $a[webpStr] webp / " .
    "saved $a[saveStr] ($a[pct]%) for $a[qtyStr]";

  $event->return = $getArray ? $a : $a['str'];
});
Using this function across all of the site's pages and averaging the result, I found that using WebP images rather than JPG/PNG images resulted in a 56% reduction in bandwidth needs for this particular website, which I thought was pretty amazing. This is a better result than what even Google suggests the savings for WebP are. That appears to be because they are comparing an optimized WebP with an optimized JPEG. In reality, on websites we are often dealing with rather unoptimized images uploaded from clients. Just the mere conversion to WebP may often be a far greater optimization than you would guess.
As of the date of this post, I've not yet converted this website (processwire.com) to use WebP images, but you can count on it being soon — having seen the difference it makes, I'll be using WebP on all of my projects from this point forward. If you've come across any helpful WebP images strategies, please share them in the comments below. Thanks for reading! I hope you all have a great weekend and enjoy reading the ProcessWire Weekly as well.
Comments

horst
- 7 years ago
- 256
★★★★★What a great write up! :-)
Well done, Ryan!
Reply
Mel
Thanks for a so detailed step-by-step. I was reluctant to modify existing website, but I will at least try to test my server and consider using method #2!
Reply